
Efflorescence is the white, chalky salt deposit that forms when water carries dissolved minerals to the surface of brick or mortar and leaves them behind as it evaporates. It is almost always cosmetic rather than structural, but its presence means water is moving through your masonry, which is worth investigating. The fix is always two steps: stop the water first, then clean the salt residue.
TL;DR:
- Efflorescence indicates water movement through masonry but is mainly cosmetic; fixing requires stopping water flow before cleaning salt deposits.
- Common water entry points include failed flashing, blocked gutters, cracks in sills or mortar joints, and improper drainage around the foundation.
- Natural weather, gentle brushing, and mild cleaners resolve most efflorescence, while aggressive acids and high-pressure washing should be last resorts.
- Preventing recurrence depends on managing moisture sources, such as maintaining gutters, repairing flashings, and avoiding sealers over active leaks.
- Persistent efflorescence or widespread damage warrants professional diagnosis and repairs, including targeted joint repointing and cavity drainage improvements.
Table of Contents
- What is efflorescence on brick and how do you spot it?
- What causes efflorescence and where do the salts come from?
- When does efflorescence typically appear, and what does the pattern tell you?
- How do you find the source of the moisture before cleaning?
- How do you remove efflorescence from brick safely?
- How do you stop efflorescence coming back?
- When should you call a professional for efflorescence?
- What a controlled cleaning approach gets right that DIY often misses
- Get a professional diagnosis and clean from Fresh Exteriors
- Sources
What is efflorescence on brick and how do you spot it?
Brick, mortar and the materials behind them all contain soluble salts, mainly sulphates and carbonates of sodium, potassium and calcium. When water passes through these materials, it dissolves the salts and carries them towards the surface. As the water evaporates, the salts crystallise and are left behind as a visible bloom.
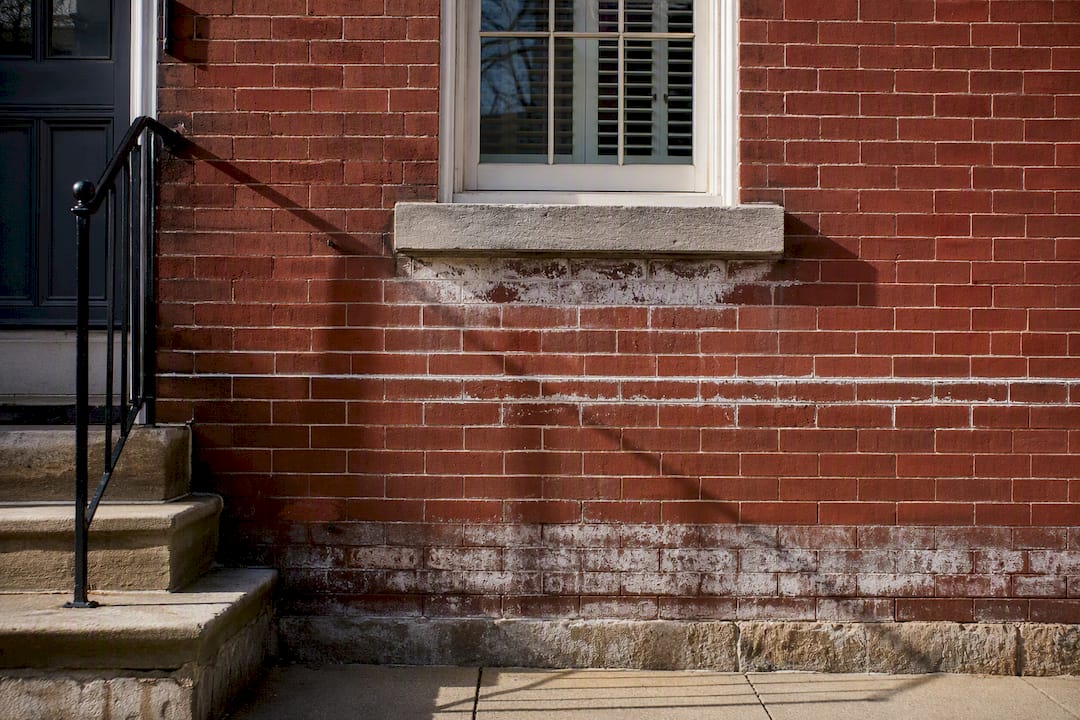
Most commonly, this shows up as a white, powdery film that looks a bit like frost or dried chalk dust. Sometimes it appears grey, yellow or brown, depending on the specific mineral content of the salts involved. You will find it on clay brick, mortar joints and concrete alike, and it tends to concentrate wherever water has been sitting or draining slowly, rather than spreading evenly across a wall.
What causes efflorescence and where do the salts come from?
Wet mortar during construction is one of the most frequent culprits. Fresh mortar holds a lot of moisture, and as it cures, soluble salts migrate outward and into the adjacent brick. This is why so many people notice new build bloom on properties less than a year or two old.
Beyond mortar, several other sources feed the same process. Backing materials behind a brick veneer, contaminated mixing water used during construction, salts naturally present in the surrounding soil, and de-icing salts applied to nearby paths or driveways can all migrate into brickwork over time. Poor workmanship compounds the problem: mortar left too wet, a blocked cavity that traps moisture, or bricks stored outdoors and left to soak up rain before they were even laid. Each of these adds another route by which salt-laden moisture reaches the wall face.
When does efflorescence typically appear, and what does the pattern tell you?
New masonry often shows a flush of efflorescence during the first season after construction, particularly following prolonged wet weather, as residual construction moisture works its way out. This early bloom is often considered a temporary, seasonal issue that settles down as the building dries and stabilises, according to Prosoco’s guidance on efflorescence.
On older properties, recurring efflorescence after every wet spell points to an ongoing moisture source rather than residual construction water. Location matters: deposits below a window sill usually trace back to the sill or its mortar bed, streaking along a single horizontal joint suggests that joint has failed and is channelling water, and staining concentrated at the base of a wall often signals ground splash or rising damp. A seasonal flush each spring is a useful diagnostic clue in itself, since it tells you the moisture pathway is still active.
How do you find the source of the moisture before cleaning?
Cleaning without finding the water source is a waste of effort. It just comes back. Work through the building systematically before you touch a brush.
- Check gutters and downpipes for blockages, splits, or misaligned joints that let water run down the wall face.
- Inspect flashings and coping stones at parapets, chimneys and window heads for cracks or gaps.
- Examine sill details and mortar joints beneath windows for hairline cracks that let rain track behind the brick.
- Confirm weep holes at the base of cavity walls are open and not painted or mortared shut.
- Check ground grading around the foundation to make sure water drains away from the wall, not towards it.
A simple tactile test helps confirm an active leak: press your hand against the brick after several days of dry weather. Lingering dampness at that point means water is still finding its way in from somewhere. For anything ambiguous, a moisture meter gives a quick reading, and a lab salt analysis using techniques like X-ray diffraction can identify the exact salt composition behind persistent or unusual staining. Once you know the source, you can scope the repair honestly: a single failed joint usually needs nothing more than targeted repointing, while widespread staining across a wall often points to a bigger drainage or flashing problem.
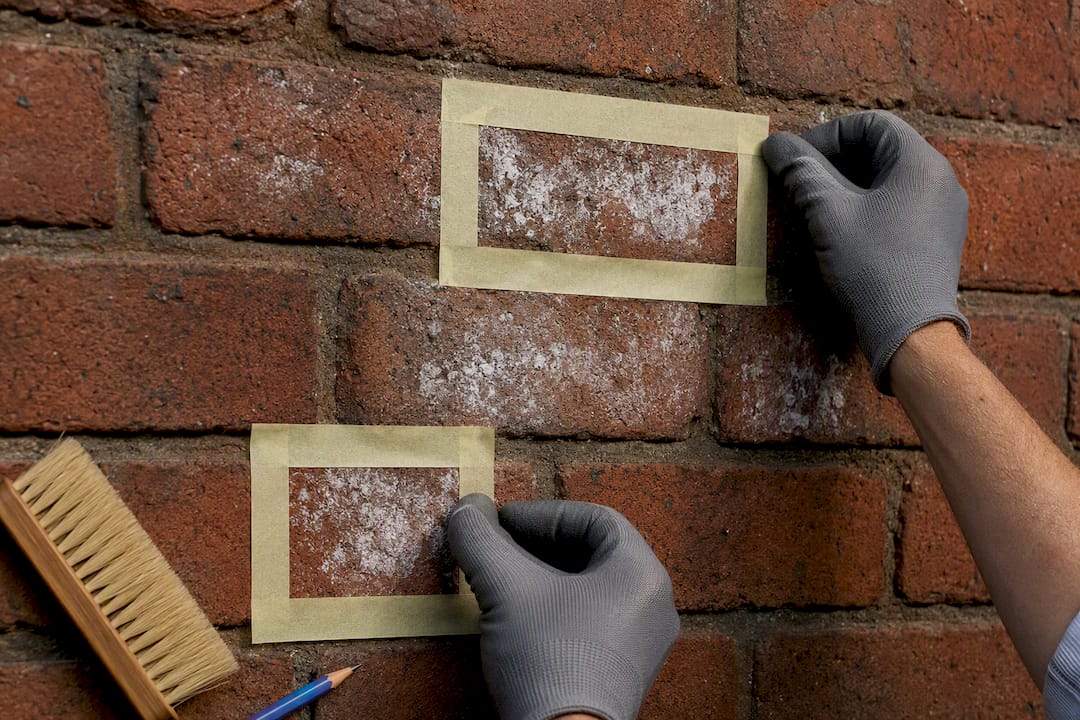
Pro Tip: Mark each patch of efflorescence with masking tape and the date you spotted it. If the same patch reappears after the wall has had a full dry spell, you’re looking at an active leak, not residual construction moisture.
How do you remove efflorescence from brick safely?
Removal should always follow a tiered approach, starting with the gentlest method and only escalating if it fails. Jumping straight to a strong acid on the first attempt is how people end up damaging brick faces that a soft brush would have cleaned perfectly well.
- Let the weather do the first pass. Rain and natural drying often wash away light efflorescence on their own within a season, especially on new masonry. Wait for a dry, warm spell before intervening, since cleaning in damp or cool conditions can redissolve the salts and simply push them back into the wall.
- Dry brush. Use a stiff nylon or natural bristle brush to scrub the deposit off the surface, then rinse gently with a garden hose or low-pressure setting. This alone clears the majority of household cases.
- Try a mild cleaner on a test patch. A diluted vinegar solution, roughly one part vinegar to five parts water, works on many bricks. Apply it to a small, hidden area first, then neutralise and rinse thoroughly once you’re satisfied it isn’t discolouring the brick.
- Escalate to a commercial cleaner only as a last resort. Muriatic or hydrochloric acid solutions can shift stubborn deposits, but they demand gloves, eye protection and good ventilation, plus a patch test first. Some acid formulations suited to concrete will damage clay brick, so match the product to the material.
Two cautions apply throughout. Avoid high-pressure washing above safe thresholds for older or soft brick, since excessive pressure can blow out mortar joints and force water further into the wall. And skip film-forming sealers altogether. They trap moisture and salts behind the surface rather than letting the wall breathe, which tends to make efflorescence worse over time and can eventually contribute to spalling.
How do you stop efflorescence coming back?
Prevention is entirely about managing water, since no amount of cleaning solves a wall that keeps getting wet. Once the moisture pathway is closed off, the salts already in the brick have nothing left to carry them to the surface.
- Keep gutters and downpipes clear and properly pitched so rainwater is carried away from the wall rather than sheeting down it.
- Improve grading around the foundation and add splash protection where downpipes discharge close to the wall base.
- Repair or replace failed flashings, copings and sills, since these are common entry points for water behind the brick face.
- Keep weep holes and cavity drainage clear so any moisture that does get into the cavity can escape.
- Repoint mortar joints that have cracked, crumbled or pulled away from the brick edge.
During new construction or repair work, using low-alkali mortars and keeping bricks dry before laying reduces the salt load significantly. Industry guidance also favours air-space drainage wall systems, which physically separate brick from salt-bearing backing materials and improve overall drainage. Again, resist the urge to seal the wall as a shortcut. A film-forming sealer over a wall that still has an active moisture problem is storing up a bigger repair for later.
When should you call a professional for efflorescence?
Call in a specialist when efflorescence keeps returning across a wide area, when you notice mortar loss or spalling brick faces, or when the moisture source is somewhere you can’t easily inspect, such as inside a cavity wall or behind cladding.
A professional visit typically includes a detailed diagnosis of the water pathway, repointing of failed joints, flashing repair, specialist cleaning suited to your specific brick type, and cavity drainage improvements where needed. When vetting a contractor, ask what diagnostic method they use, whether they test cleaning products on a patch first, and what guarantee they offer on repointing work. A contractor who wants to clean before diagnosing the leak is skipping the step that actually matters.
What a controlled cleaning approach gets right that DIY often misses
Most efflorescence problems homeowners bring to us aren’t really cleaning problems. They’re diagnosis problems that happen to show up as a cleaning symptom. Isolating the water source before touching a brush changes the entire job: once the leak is closed off, the salt deposit is usually just cosmetic residue that comes away with a soft-wash pass rather than an aggressive scrub.
Soft-wash, low-pressure techniques matter here because they clear the surface without forcing more water into mortar joints or eroding the brick face, a real risk with high-pressure jetting on older masonry. Fresh Exteriors applies this same logic across brickwork and stone cleaning, repointing and gutter, fascia and soffit work, treating the water pathway and the surface stain as two separate jobs rather than one.
— Michael
Get a professional diagnosis and clean from Fresh Exteriors
If you’ve worked through the checks above and you’re still seeing white bloom return after every wet spell, a site visit settles the question faster than another round of scrubbing and guessing. Fresh Exteriors combines brickwork and stone cleaning with repointing and flashing repair, so the same visit that identifies a failed joint can also fix it, rather than leaving you to book a second contractor.

A typical visit starts with an inspection of gutters, flashings, sills and mortar joints to pin down exactly where water is entering, followed by soft-wash, low-pressure cleaning that lifts the salt deposit without stressing the brick face or mortar. Pricing is generally structured per square metre, agreed before work starts, so there are no surprises once the job is done. If your brickwork keeps showing that white bloom no matter how often you clean it, request a quote or site inspection from Fresh Exteriors and get an answer on what’s actually causing it.
Sources
For technical detail on removal chemistry and prevention, see the Brick Industry Association’s technical note and Prosoco’s practical removal guidance.