
The safest way to clean a tarmac driveway is a tarmac-safe detergent, a controlled or soft wash rather than a blast of full pressure, and allowing enough time for the surface to dry out fully before you seal anything. Sweep and pre-treat first. If you’re dealing with large oil stains, tarmac under a year old, or a surface that’s already pitted and crumbling. That’s a job for a professional like Fresh Exteriors rather than a DIY weekend.
TL;DR:
- Use a controlled or soft wash with biodegradable detergent and avoid high PSI pressures to prevent damaging the tarmac surface.
- Inspect the driveway carefully for cracks or soft patches, and pre-treat stains with appropriate moss or oil removers before washing.
- Wait at least an hour after cleaning, or perform a plastic-sheet moisture test, to ensure the surface is completely dry before sealing.
- For moss or algae removal, treat growth with specific removers and wait several days for browning before brushing or rinsing.
- Call a professional if the driveway has extensive pitting, set-in stains, or has been laid less than a year, to avoid costly damage from DIY cleaning.
Table of Contents
- What you need before you start cleaning tarmac
- How do you clean a tarmac driveway step by step?
- How do you remove moss and algae from tarmac safely?
- Getting oil and tyre marks off a tarmac drive
- Pressure washing or soft washing: which is safe for tarmac?
- When can you seal a driveway after cleaning it?
- When should you call a professional tarmac cleaner?
- Why “tarmac safe” matters more than raw cleaning power
- Ready to book a professional driveway clean?
- Sources
What you need before you start cleaning tarmac
Half the mistakes people make with tarmac driveway cleaning happen because they grab whatever’s in the shed and start blasting. Get the right kit lined up first and the job goes faster, with far less risk of stripping the binder or scattering aggregate across the lawn.
Tools:
- A stiff synthetic broom (not wire) for loose debris
- A pressure washer with adjustable PSI and a fan-jet or surface-cleaner attachment
- A garden hose for rinsing and pre-wetting
- A bucket for mixing detergent
Consumables and safety kit:
- A biodegradable, asphalt-safe detergent or dedicated moss remover
- A degreaser for oil and tyre marks
- Cat litter or sawdust for fresh spills
- Gloves and goggles, plus a small offcut or hidden corner to spot-test any product before you commit the whole driveway
Spot-testing matters more than people think. Some cleaners react badly with existing sealant, so a patch test in a corner saves you from discovering a discoloured stripe across the middle of your drive.
How do you clean a tarmac driveway step by step?
Work through this in order and you’ll avoid the two things that cause most damage: rushing the pressure washer and sealing over moisture that hasn’t escaped yet.
- Inspect first. Walk the whole surface looking for cracks, soft patches, or areas where the tarmac still looks freshly laid. Note anything fragile, because that’s where you’ll dial back pressure or skip the washer entirely.
- Clear and sweep. Remove leaves, gravel, and weeds growing through joints. If there’s a fresh oil spill, cover it with cat litter or baking soda straight away and leave it to soak up before you do anything else.
- Pre-treat. Apply your moss remover or asphalt-safe detergent to stains and green patches, then leave it for the dwell time stated on the product, often several days for the toughest moss.
- Wash. Use a soft wash or controlled pressure setting, moving the wand in steady overlapping passes. Start at the highest point of the driveway and work down towards the drain or edge, so dirty run-off doesn’t pool back over ground you’ve already cleaned.
- Rinse and dry. Hose down thoroughly to clear detergent residue, then leave the surface to dry fully before you drive on it heavily or think about sealing.
Pro Tip: Work in sections roughly two metres wide. It stops detergent drying on the surface before you’ve rinsed it, which is what causes those patchy, streaked marks people mistake for permanent staining.
How do you remove moss and algae from tarmac safely?
Green staining and moss are the most common complaint on shaded or north-facing driveways, and they’re also the easiest thing to damage if you go in with a metal scraper. Patience beats force here every time.
- Apply a specialist moss or algae remover at the dilution the manufacturer states, don’t overdo the concentration thinking it’ll work faster.
- Leave it. Treated growth typically needs several days to brown and loosen before it lifts easily.
- Once it’s browned off, a stiff synthetic brush or a gentle rinse usually clears it. Save the scraper for genuinely stubborn clumps, and even then use a plastic edge, never metal, which gouges the bitumen surface.
- Prevent regrowth by trimming back overhanging branches or shrubs that keep the drive shaded and damp, and check your drainage falls correctly so water doesn’t pool.
A light retreatment once or twice a year keeps moss from re-establishing, which is far less work than letting it take hold again and starting the whole browning process over.
Getting oil and tyre marks off a tarmac drive
Fresh spills are forgiving. Set-in stains are not, so speed matters more than product choice in the first few minutes after a spill.
- Cover a fresh oil spill immediately with cat litter, sawdust, or baking soda. Applied quickly, absorbents can lift the majority of a fresh spill before it soaks into the surface.
- For marks that have already set, use a dedicated degreaser rather than a general household cleaner. Apply it, give it proper dwell time, then work it in with a stiff nylon brush and rinse thoroughly.
- Skip the wire brush. It scratches the surface and creates more places for the next stain to grip.
- Some tyre and oil marks that have sat for months or years have soaked deep into the binder. If a degreaser and scrubbing barely shift it, that’s usually a sign you need professional extraction rather than a stronger chemical.
Pressure washing or soft washing: which is safe for tarmac?
This is where most DIY jobs go wrong, and it comes down to one number people rarely check before they start: PSI.
Domestic pressure washers run anywhere from 500 to 4,000 PSI. For tarmac, the safe working range sits around 1,200 to 1,900 PSI, and if your driveway is older or already showing wear, staying under the safer end of the pressure range keeps you well clear of eroding the binder that holds the aggregate together. Very high pressures start to risk stripping surface material, not just dirt.
Fan nozzles between 25 and 40 degrees spread the force over a wider area rather than concentrating it into one point, which is exactly what a narrow zero-degree nozzle does, and why it’s the setting most likely to gouge a channel into soft tarmac. Keep the wand 18 to 36 inches from the surface, angled slightly rather than straight down, and move it steadily rather than lingering.
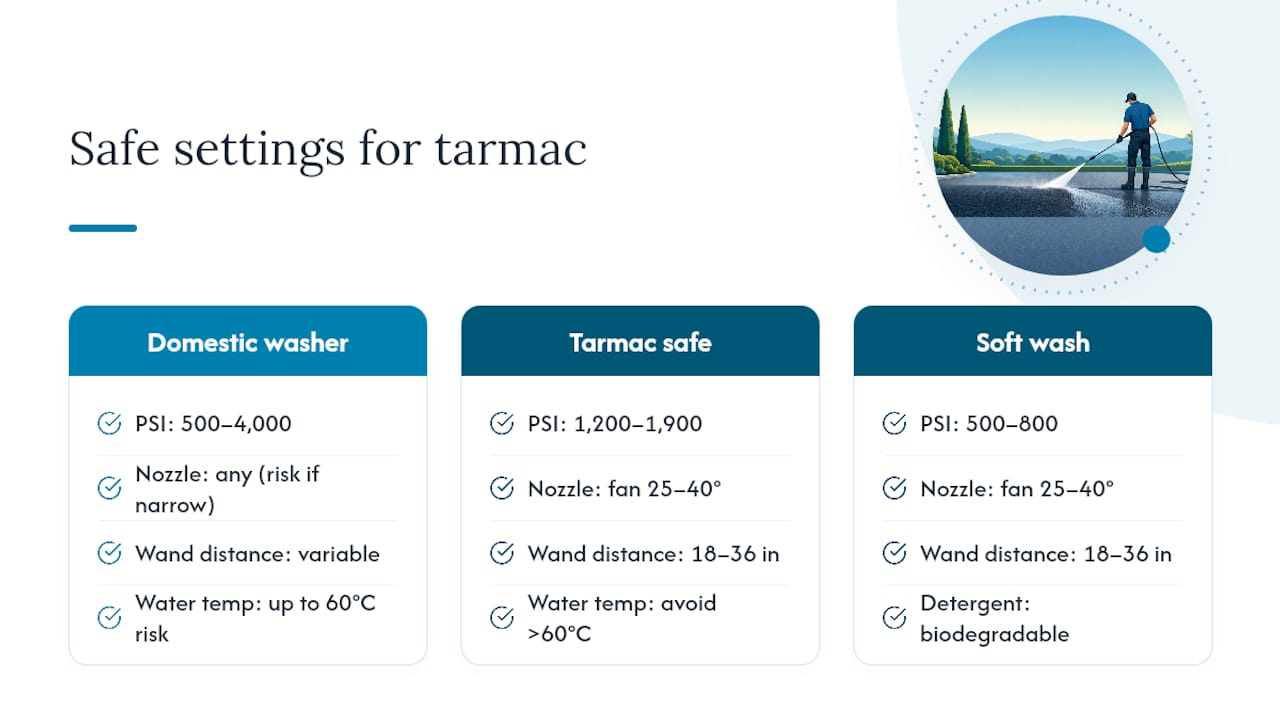
For anything aged, ravelled, or already pitted, a soft wash, low pressure around 500 to 800 PSI paired with a biodegradable detergent, lifts algae and grime without disturbing the aggregate the way high pressure can. Never pressure wash tarmac under six to twelve months old; it hasn’t fully cured. And avoid hot water above roughly 60°C, which softens the binder. If you’re working near flowerbeds or lawn edges, direct run-off away from soil so detergent doesn’t pool around root systems.
When can you seal a driveway after cleaning it?
Sealing too soon is one of the most common and most avoidable mistakes homeowners make. Moisture trapped under a fresh seal coat has nowhere to go, and it shows up later as bubbling or peeling.
- Wait sufficient time after cleaning before applying any sealant to ensure the surface is fully dry; longer drying times are needed in cold or damp weather.
- Run a simple check before committing: tape a 30cm sheet of plastic to a cleaned patch and leave it for an hour. Any condensation underneath means moisture is still trapped and sealing needs to wait.
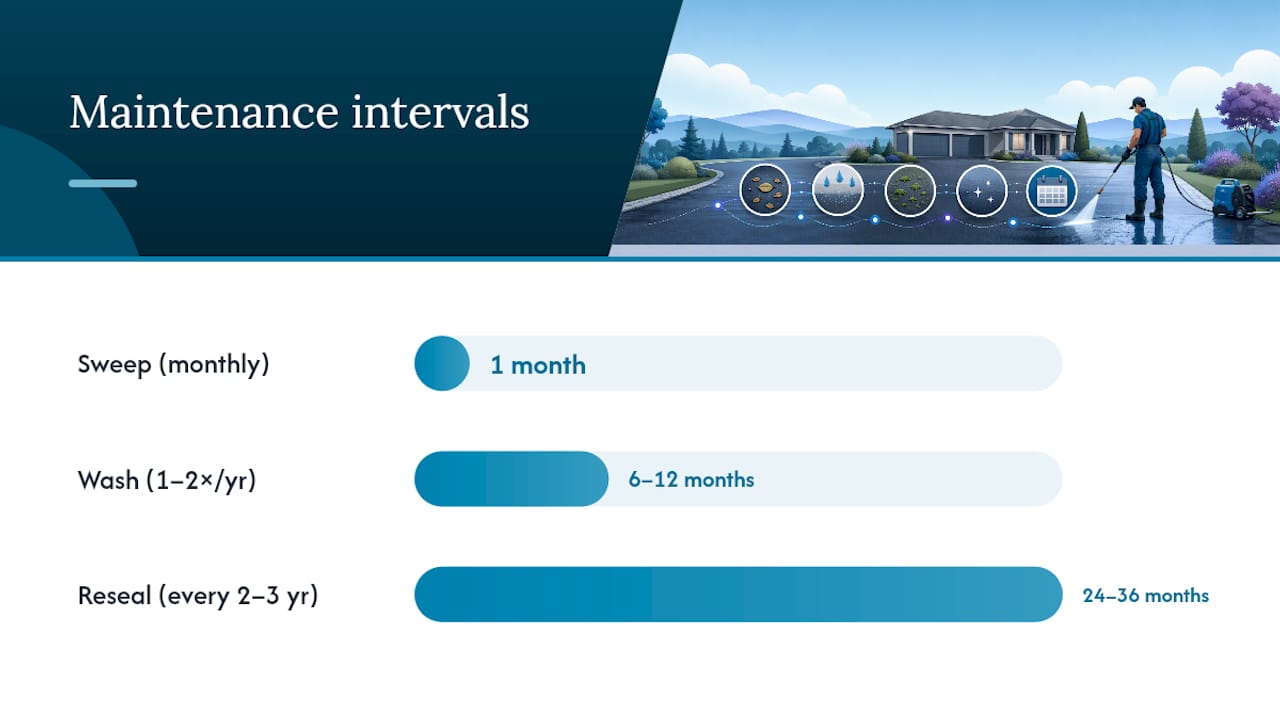
- Reseal every two to three years, and doing it straight after a proper clean gives the coating the best surface to bond to.
- Between deep cleans, sweep monthly, do a thorough wash once or twice a year, and treat spills the moment they happen rather than letting them sit.
Pro Tip: Do the plastic-sheet test on a day when the weather’s stayed dry. Testing straight after rain will show condensation regardless of how well the surface actually drained.
Regular light maintenance, similar in principle to keeping on top of routine window cleaning schedules, keeps any exterior surface from reaching the point where only a deep intervention will fix it.
When should you call a professional tarmac cleaner?
Some jobs are genuinely beyond a garden hose and a Saturday afternoon. Heavy, set-in oil stains that have soaked through the surface, driveways with extensive pitting where deep moss has taken root, tarmac laid within the last year, or simply a large area you don’t have the time or equipment to cover properly, these are all situations where calling in help makes more sense than persisting with DIY.
Fresh Exteriors uses advanced soft-washing and controlled pressure techniques designed specifically to clean without damaging the surface underneath, the same principle behind the low-PSI, wide-nozzle approach covered above, just carried out with commercial-grade equipment and experience reading a surface’s condition before choosing a technique. For a driveway that’s fragile, heavily stained, or simply too large to tackle safely yourself, that judgement call is worth paying for.
Why “tarmac safe” matters more than raw cleaning power
The instinct with any dirty surface is to reach for the strongest tool available, more pressure, stronger chemicals, more scrubbing. With tarmac, that instinct is backwards. Bitumen binder is a soft material holding hard aggregate in place, and every guide that quotes a PSI ceiling or warns against bleach is really making the same point from different angles: force applied carelessly doesn’t just fail to clean the surface, it dismantles it.
What gets underestimated is drying time. People will spend an afternoon carefully dialling in the right nozzle and detergent, then seal the same day because the surface looks dry. It rarely is. The condensation test takes an hour and costs nothing, yet it’s the step almost everyone skips.
If there’s one thing worth prioritising above all else here, it’s restraint. Lower PSI than you think you need, longer dwell times than feels necessary, and a genuine pause before sealing. Where a driveway is already fragile or the stain is beyond a weekend fix, that’s not a failure of DIY, it’s simply the point where professional judgement earns its cost.
— Michael
Ready to book a professional driveway clean?
If your driveway needs more than a broom and a bit of patience, professional driveway and patio cleaning services can cover moss and algae treatment, oil and grease stain removal, and surface sealing once everything’s properly dried out, often handled with soft-wash and controlled-pressure techniques suited to the age and condition of your tarmac.

Getting a quote is straightforward: describe your driveway’s size and condition, and get a fixed price before any work starts. No guesswork over PSI settings, no risk of a rushed rinse leaving moisture trapped under a fresh seal. If your tarmac has reached the point where DIY feels like a gamble, get in touch with Fresh Exteriors for a quote and book your driveway clean.